Saturday, December 31, 2011

Bubbly Bubbles

It's New Year's Eve! Time for breakable resolutions and champagne. My over-achieving friends have decided to have a party. By the time I confirmed my other half and I could go, they had already firmed up a knock out menu. Hot taco dip, pigs in a blanket, turkey pinwheels, spinach artichoke dip, cupcakes with champagne frosting (courtesy of jay.mariah creations), wine, tequila, Mt. Dew, Pepsi, and Apples to Apples.  With a spread like that, what's a girl to do? Paper plates - boring. Fruit and veggie tray - easy. Champagne Jell-O shots? Now we're talking!

*  *  *  *  *


Bubbly Bubbles


Ingredients:
1 (3 oz.) box Island Pineapple Jell-O
2 packets unflavored gelatin
1 c. pineapple juice
1 2/3 c. Cook's spumanti champagne
Pam cooking spray

Tools:
Plastic or silicone molds
Small saucepan
Medium bowl
Stirring spoon
Sharp paring knife


1. Spray molds with Pam and wipe excess with a napkin.

2. Put pineapple Jell-O in a medium size bowl. Set aside.

3. Sprinkle unflavored gelatin over fruit juice in a small saucepan. Let stand 1 minute.

4. Stir over low heat 2-3 minutes until gelatin granules completely dissolve.

5. Add liquid mixture to dry pineapple Jell-O and stir until dissolved.

6. Gently stir in champagne. It will create a frothy foam. Go ahead and use it in the molds. It won't hurt!

7. Pour into prepared molds and refrigerate until firm (about 3 hours).


8. Use a paring knife to cut around the mold to help release the Jell-O.

For the best bubbly experience, serve the same day.

Original recipe here.

Saturday, December 3, 2011

From Rags to Curls

My Bucket List is an odd one. Included are things not so unusual like skydiving and traveling. Then there are the other things that aren't on everyone's typical BL: learn sign language, read the last Harry Potter novel (you will not BELIEVE how crucial that one was), be a Big for Big Brothers Big Sisters (one of the most rewarding things I've ever done. I miss my Little so much!), and donate hair to benefit children who battle cancer. Until recently, I had fulfilled all of my "unusual" items save the last one. 

This past Thanksgiving, I was finally able to check it and 12 inches of hair off!


So in celebration of the past two years, I'm going to show you one of the ways I've avoided hours of trying to do my hair for work. Behold! The miracle of rag rollers! Rag rollers are pieces of cloth that you can use to tie your hair into knots to make curls. I love this old timey technique. It's easy, doesn't use heat, and I can sleep on it to have my hair curly by morning.

Old Timey Rag Rollers

Items Needed:
Scrap t-shrit
Scissors

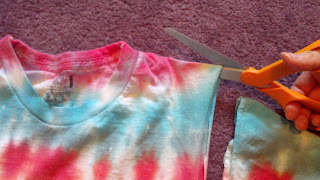
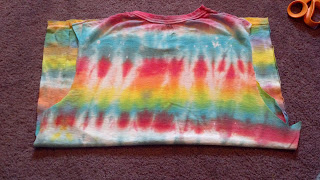
First, grab an old t-shirt. This is one of the millions of tie dye shirts I made at work over the summer.

Cut the sleeves off both sides of the shirt. Make sure the seam is on the sleeve side.

Cut the shoulders at the top of the shirt.

Cut both sides of the shirt to separate the front and the back.

Fold the shirt in half, top down.

Cut through both the front and back of the shirt at the fold.

^Toes!                                             
You should now have four pieces of cloth.

Begin at the bottom seam and start rolling.

Keep going!

For the top pieces, begin at the shoulder. 

Roll each side and keep rolling as with the other pieces.

You may need to tuck in flaps.

Viola! Four rag rollers ready for use.

You can even re-purpose the sleeves as sock bun rollers by rolling them up-on themselves.

Find out how to make rag rolled curls and sock bun curls through these YouTube links. I don't have enough hands to roll and take pictures!


Tuesday, November 29, 2011

A Candy Apple Kind of Love

*sigh* Fair/Festival season is long over. And so I must bid farewell to my favorite time of year. Merchants selling their cheap crap, the smell of over-priced food permeating through the air, and fresh cotton candy on a stick. It doesn't matter how many times I walk the same midway, I love it more and more. My boyfriend, Colin, is a sweetheart and will bear the shoulder to shoulder crowds to avoid the impending hissy fit I throw should I miss the fair. He also stands it for the love of his Grandma Ann.

Grandma Ann's material loves are pretty straightforward: cooking, Jeopardy!, and candy apples. And one out of four seasons of the year, Colin and I can hit the trifecta. We go to the fair, spend only enough money to satisfy the grease craving, buy a few granny smith candy apples, go to Grandma Ann's and eat a home-cooked meal as we watch Jeopardy! and she eats her candy apple.

Now that fair season is over, I think Grandma Ann is feeling the depression creeping in, too. I was recently told that Grandma Ann had a discussion with Colin in which my love for him came into question. Her words, as quoted to me by Colin, were, "If Andrea really loved you, she would learn how to make candy apples." I looked at Grandma Ann over the steak dinner we were enjoying as Colin recanted the tale. A knowing smirk on her lips. Game on, Grandma Ann. Game on.

Tips for making candy:
- Do not make candy when the weather is humid.
- Use extreme caution. Boiling sugar is dangerous!
- Do not allow crystals to form on your pan. It will cause the entire pan of sugar to crystallize, and you'll be left with a gritty mess.

  ^I was having too much fun with the excess candy (>.<) 

Candy Apple Love
Makes 4-5 candy apples

Ingredients:
4-5 Granny Smith apples
1 c. sugar
½ c. light corn syrup
¼ c. hot water
¼ c. crushed Red Hots candies


Tools:
4-5 popsicle sticks
Silicone mat
Zip top baggie
Hammer/ Meat tenderizer/ Food processor
Small saucepan
Candy thermometer
Heat safe spatula
Heat safe pastry brush


Directions:

Wash and dry the apples. Twist off the stems and insert popsicle sticks.

Put Red Hot candies in a zip top bag. Close the bag and crush the crap out of those little red gems!

You could use a food processor instead, but who couldn't use a little stress relief?

In a small saucepan, combine water, corn syrup, and sugar over medium-high heat.

Stir until sugar dissolves.

Sugar grit is evil.
Occasionally wash down the sides of the saucepan with a wet pastry brush to avoid crystallization. 
Continue to cook without stirring until a candy thermometer inserted in the syrup reads 250°. Be patient. This will happen slowly.

Add Red Hots candies and stir just to incorporate.

Continue to cook without stirring, washing down the sides as needed, until temperature reaches 285°. Watch the thermometer carefully. Unlike the last 250°, this will happen quickly.

Remove from heat and stir candy until it is smooth and even.

Hold an apple by the stick and dip it in the candy. You may tilt the pan at an angle and rotate the apple to cover it completely. Twist apple by the stick to shake off excess candy. Set on silicone mat. Quickly finish dipping the rest of the apples. If you have extra candy, pour into a silicone mold or on to your silicone mat to make little hard candies.

Allow to cool to room temperature before eating*. 

*My test monkey (AKA Jordan) and I didn't wait until it was room temperature. We just waited long enough for the candy to harden and cool enough that molten sugar wasn't going to burn the flesh off our mouths. I have to admit, it was pretty tasty with the warm apple and cinnamon-ny spiciness. Grandma Ann loved them almost as much as I love her grandson.  <3

Recipe adjusted from this original.

Monday, November 21, 2011

Holy Trinity


Bacon, jalapeños, cream cheese. Those are the three ingredients of which love is made. There is not an easier, more tasty recipe out there for these little bundles of joy. Best of all, they're not breaded and they're baked. My boyfriend's best friend's fiancée (let's call her Marcie) gets the credit for this wonderful recipe.

Bacon Wrapped Jalapeño Poppers


Ingredients:
Maple cured bacon
Philadelphia Cream Cheese (tub, not the block)
Fresh
jalapeños
 
Tools:
Cookie tray with raised edges
Kitchen scissors or knife
Kitchen gloves
Cutting board
Paring knife
Spoon
Butter knife
Wooden toothpicks

Preheat the oven to 350°


With kitchen scissors or a knife, cut bacon in half and place on a cookie sheet in a single layer. Bake bacon until cooked and golden brown.

Meanwhile, arm yourself with kitchen gloves and remind yourself not to touch your face, eyes, mouth, nose, or any other open orifice while handling
jalapeños. (Your hands and face will thank you.) Cut the caps off and cut in half lengthwise. With a spoon, scrape out the seeds and white ribbing inside. Discard the caps, seeds, and ribbing. The seeds and ribbing are the source of the jalapeño's power -I mean- heat. If you want your poppers to be extra hot, leave a little bit if the ribbing in the pepper.

Use a butter knife to fill the
jalapeños with cream cheese. Wrap with cooked bacon and pin it with a toothpick.

Place the stuffed
jalapeños onto the same baking tray you cooked the bacon on and heat for 10-15 minutes or until the jalapeños are heated through but not mushy. Drain excess bacon grease on a few layers of paper towel.

Variations: The cream cheese can be a vessel for all kinds of flavors. Spices, shredded cheddar cheese, bacon bits, whatever your heart desires. My theory, however, is the invention of cream cheese is God's way of showing that He loves us and needs not to be tampered... at least not in this recipe anyway. These poppers are a great way of showing people you love them. Unless you have a boyfriend like mine who doesn't like peppers. Then it's a great way to show his friends that you love them.

Saturday, November 12, 2011

Garlic Odors Meet Your Un-Maker!

Over the years, I have seen some ridiculous things but this is near the top of my list:

This my friends, is Sagaform EDGE Odor Remover Metal Soap. It is a stainless steel metal block that will remove garlic and onion odors from your hands. You can buy it for $14.95 at Amazon. Awesome. I hate the lingering smell of garlic and onions on my hands. 

But think about it. Wait for it! That's right. It's just a hunk of metal. Honestly, there is nothing special about this "soap" at all. In the end, as long as you haven't let the offending odors seep into your skin, you should be able to remove the scent by rubbing your hands on any stainless steel appliance, utensil, or tool you have. I use the faucet. Sometimes, when I feel like living on the edge, I use the sides of a large knife while I'm cleaning it.

There. You just saved 15 bucks. Don't you feel thrifty?

Thursday, November 3, 2011

Out of House and Home

Surprise! Your cousin is going into labor 2 weeks early! And guess what? You agreed to house and dog-sit while her and her husband are at the hospital.

That's what my week has been like. On Monday, October 31 I got a text saying that my cousin was in labor. I received the text immediately after having an hour long massage. (I would like to say I was nice and relaxed, but that would be lying. I had the massage to alleviate pain. And if any one has ever had a massage to alleviate pain, they too know that it is anything but relaxing.) Anyway, on the way home I stopped at the grocery store to pick up dinner. Down the freezer aisle I roamed until I spotted it. Or maybe it spotted me. Regardless of who/what did the spotting, I knew I had to have them: Pierogies.


Flashback! Post-college. Roomie: Pigat. 
Right after college, Pigat and I didn't know how to cook many things. We were more of the heat-and-eat kinds of people. Pigat's specialty was pierogies. At the time, I had no idea what pierogies were, and the whole potato/pasta thing really threw me off. But one taste and I was hooked.

So here I am in my cousin's house armed with a box of Mrs. T's, a jar of Prego, and a small zucchini. Heat-and-eat magic, here I come!


Ingredients:
1 box Mrs. T's Pierogies
1 small jar Prego spaghetti sauce
1 small zucchini
1 TBSP butter
Parmesan cheese for extra cheesy love

BEGIN! - 0:00 
Set a large pot of water to boil.

0:15 
 When water is boiling, add frozen perogies.

0:16 
 While perogies are doing their thing, chop the zucchini into ½ chunks.

0:18 
 Heat a large skillet and melt butter.

0:20 
Pierogies will float when they are ready to come out of the water.
Add perogies and zucchini to the skillet. Stir zucchini occasionally.

0:25 
 Flip perogies, toss zucchini. Pierogies and zucchini should be lightly browned.

0:30
 Add pasta sauce and stir.


Serve! - 0:33


And may I present: Jackson Andrew!  :)
Born November 1, 2011

Sunday, October 30, 2011

Wish You were Here

You know the problem with Food Blogs? They usually give you a recipe for only one part of the meal - the entree or the side. My issue with making dinner is timing. I either start cooking the sides too early or too late so then something always must be eaten cold or reheated using the microwave. So please allow me to present a new way of sharing recipes... with timing! Granted, I know I'm too lazy to make this a habit, but it sounds like a great plan, right?

The namesake for this post is an homage to how I felt after plating the meal. My thought was, "I wish Colin were here to share this." It's a wonderful dinner recipe and can be adjusted to suit your needs and tastes.

Steak with Roasted Rosemary Potatoes and Sweet Carrots
Dinner for One


I know it only looks like I have 3 potatoes, but there's one in hiding.

Ingredients:
Potatoes
4 small/medium russet potatoes
3 Tbsp. olive oil
3 tsp. kosher salt
2 tsp. cracked dried rosemary
2 tsp. paprika
1 tsp. dried cubed garlic (or garlic powder) 


That's right. Salted butter. Trust me, it's fine.
Steak
1 inch thick cut steak
2 Tbsp. Penzeys Forward! spice blend
2 Tsp. kosher salt

(Feel free to use whatever spice combination you want. If you don't have Forward! but want to mimic the flavor you can use black pepper, paprika, onion powder, and garlic powder.)


"Baby" must mean "ogre finger sized"
Carrots
water
½ bag of baby carrots
1½ Tbsp. sugar


Pan Gravy
¼ c. water
½ tsp. powdered beef base
1 Tbsp. butter
1 tsp. flour

(No beef base? No problem. Substitute beef broth for both water and base. No beef broth? Just plain water will be fine.)


*  *  *  *  *

Begin! - 0:00
Pre-heat the oven to 400°


Wash and cut potatoes into ½ inch chunks. Place on a cookie tray and coat in oil, salt, rosemary, paprika, and garlic. Place on middle rack of the oven.


0:10
Fill a medium saucepan with water and put on high heat to boil.


Toss potatoes with a spatula.


0:20


Season steak with Forward! spice blend and salt on both sides. Leave steak out so it will come to room temperature.

0:25
Add carrots and sugar to boiling water. 

Toss potatoes with a spatula.

Heat a medium skillet on medium high heat. DO NOT use a non-stick skillet and DO NOT add oil or butter to the pan.


0:35
Put steak into the skillet. Do not move it once it's in there. 

0:40
Flip steak to the other side. Once again, do not move it once it's flipped.

Toss potatoes.

Stir carrots.

0:45
Remove steak from heat. Cover with aluminum foil to keep warm and let rest. Steak will be cooked medium. If you like it a bit more done, leave it on the skillet longer.


There should be what looks like brown "burnt" bits at the bottom of your steak pan. On medium low heat, add water and beef base to the pan. 


Use a spatula to scrape the bit off the bottom of the pan and mix with the water/base. When all the bits are up, add butter. When the butter is melted and mixed in, slowly sprinkle in flour. Keep stirring until thickened.

0:50
Drain carrots. 

Take potatoes out of the oven.

Serve.


*  *  *  *  *

Okay, okay. So my sides serve a few more people than one (more like 3-4). But seriously, if I'm going to heat an oven for scant an hour, I'm gonna get the most out of it. Can we say, hello tomorrow's lunch box?

Printable Version