Saturday, December 31, 2011

Bubbly Bubbles

It's New Year's Eve! Time for breakable resolutions and champagne. My over-achieving friends have decided to have a party. By the time I confirmed my other half and I could go, they had already firmed up a knock out menu. Hot taco dip, pigs in a blanket, turkey pinwheels, spinach artichoke dip, cupcakes with champagne frosting (courtesy of jay.mariah creations), wine, tequila, Mt. Dew, Pepsi, and Apples to Apples.  With a spread like that, what's a girl to do? Paper plates - boring. Fruit and veggie tray - easy. Champagne Jell-O shots? Now we're talking!

*  *  *  *  *


Bubbly Bubbles


Ingredients:
1 (3 oz.) box Island Pineapple Jell-O
2 packets unflavored gelatin
1 c. pineapple juice
1 2/3 c. Cook's spumanti champagne
Pam cooking spray

Tools:
Plastic or silicone molds
Small saucepan
Medium bowl
Stirring spoon
Sharp paring knife


1. Spray molds with Pam and wipe excess with a napkin.

2. Put pineapple Jell-O in a medium size bowl. Set aside.

3. Sprinkle unflavored gelatin over fruit juice in a small saucepan. Let stand 1 minute.

4. Stir over low heat 2-3 minutes until gelatin granules completely dissolve.

5. Add liquid mixture to dry pineapple Jell-O and stir until dissolved.

6. Gently stir in champagne. It will create a frothy foam. Go ahead and use it in the molds. It won't hurt!

7. Pour into prepared molds and refrigerate until firm (about 3 hours).


8. Use a paring knife to cut around the mold to help release the Jell-O.

For the best bubbly experience, serve the same day.

Original recipe here.

Saturday, December 3, 2011

From Rags to Curls

My Bucket List is an odd one. Included are things not so unusual like skydiving and traveling. Then there are the other things that aren't on everyone's typical BL: learn sign language, read the last Harry Potter novel (you will not BELIEVE how crucial that one was), be a Big for Big Brothers Big Sisters (one of the most rewarding things I've ever done. I miss my Little so much!), and donate hair to benefit children who battle cancer. Until recently, I had fulfilled all of my "unusual" items save the last one. 

This past Thanksgiving, I was finally able to check it and 12 inches of hair off!


So in celebration of the past two years, I'm going to show you one of the ways I've avoided hours of trying to do my hair for work. Behold! The miracle of rag rollers! Rag rollers are pieces of cloth that you can use to tie your hair into knots to make curls. I love this old timey technique. It's easy, doesn't use heat, and I can sleep on it to have my hair curly by morning.

Old Timey Rag Rollers

Items Needed:
Scrap t-shrit
Scissors

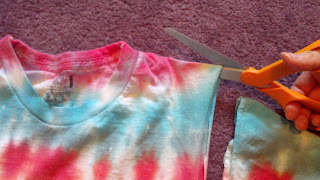
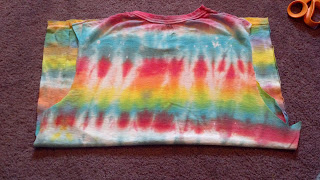
First, grab an old t-shirt. This is one of the millions of tie dye shirts I made at work over the summer.

Cut the sleeves off both sides of the shirt. Make sure the seam is on the sleeve side.

Cut the shoulders at the top of the shirt.

Cut both sides of the shirt to separate the front and the back.

Fold the shirt in half, top down.

Cut through both the front and back of the shirt at the fold.

^Toes!                                             
You should now have four pieces of cloth.

Begin at the bottom seam and start rolling.

Keep going!

For the top pieces, begin at the shoulder. 

Roll each side and keep rolling as with the other pieces.

You may need to tuck in flaps.

Viola! Four rag rollers ready for use.

You can even re-purpose the sleeves as sock bun rollers by rolling them up-on themselves.

Find out how to make rag rolled curls and sock bun curls through these YouTube links. I don't have enough hands to roll and take pictures!